"quilts"

Randa - A Mini Quilt From My Trip Diary Scraps

Randa

28: x 26”

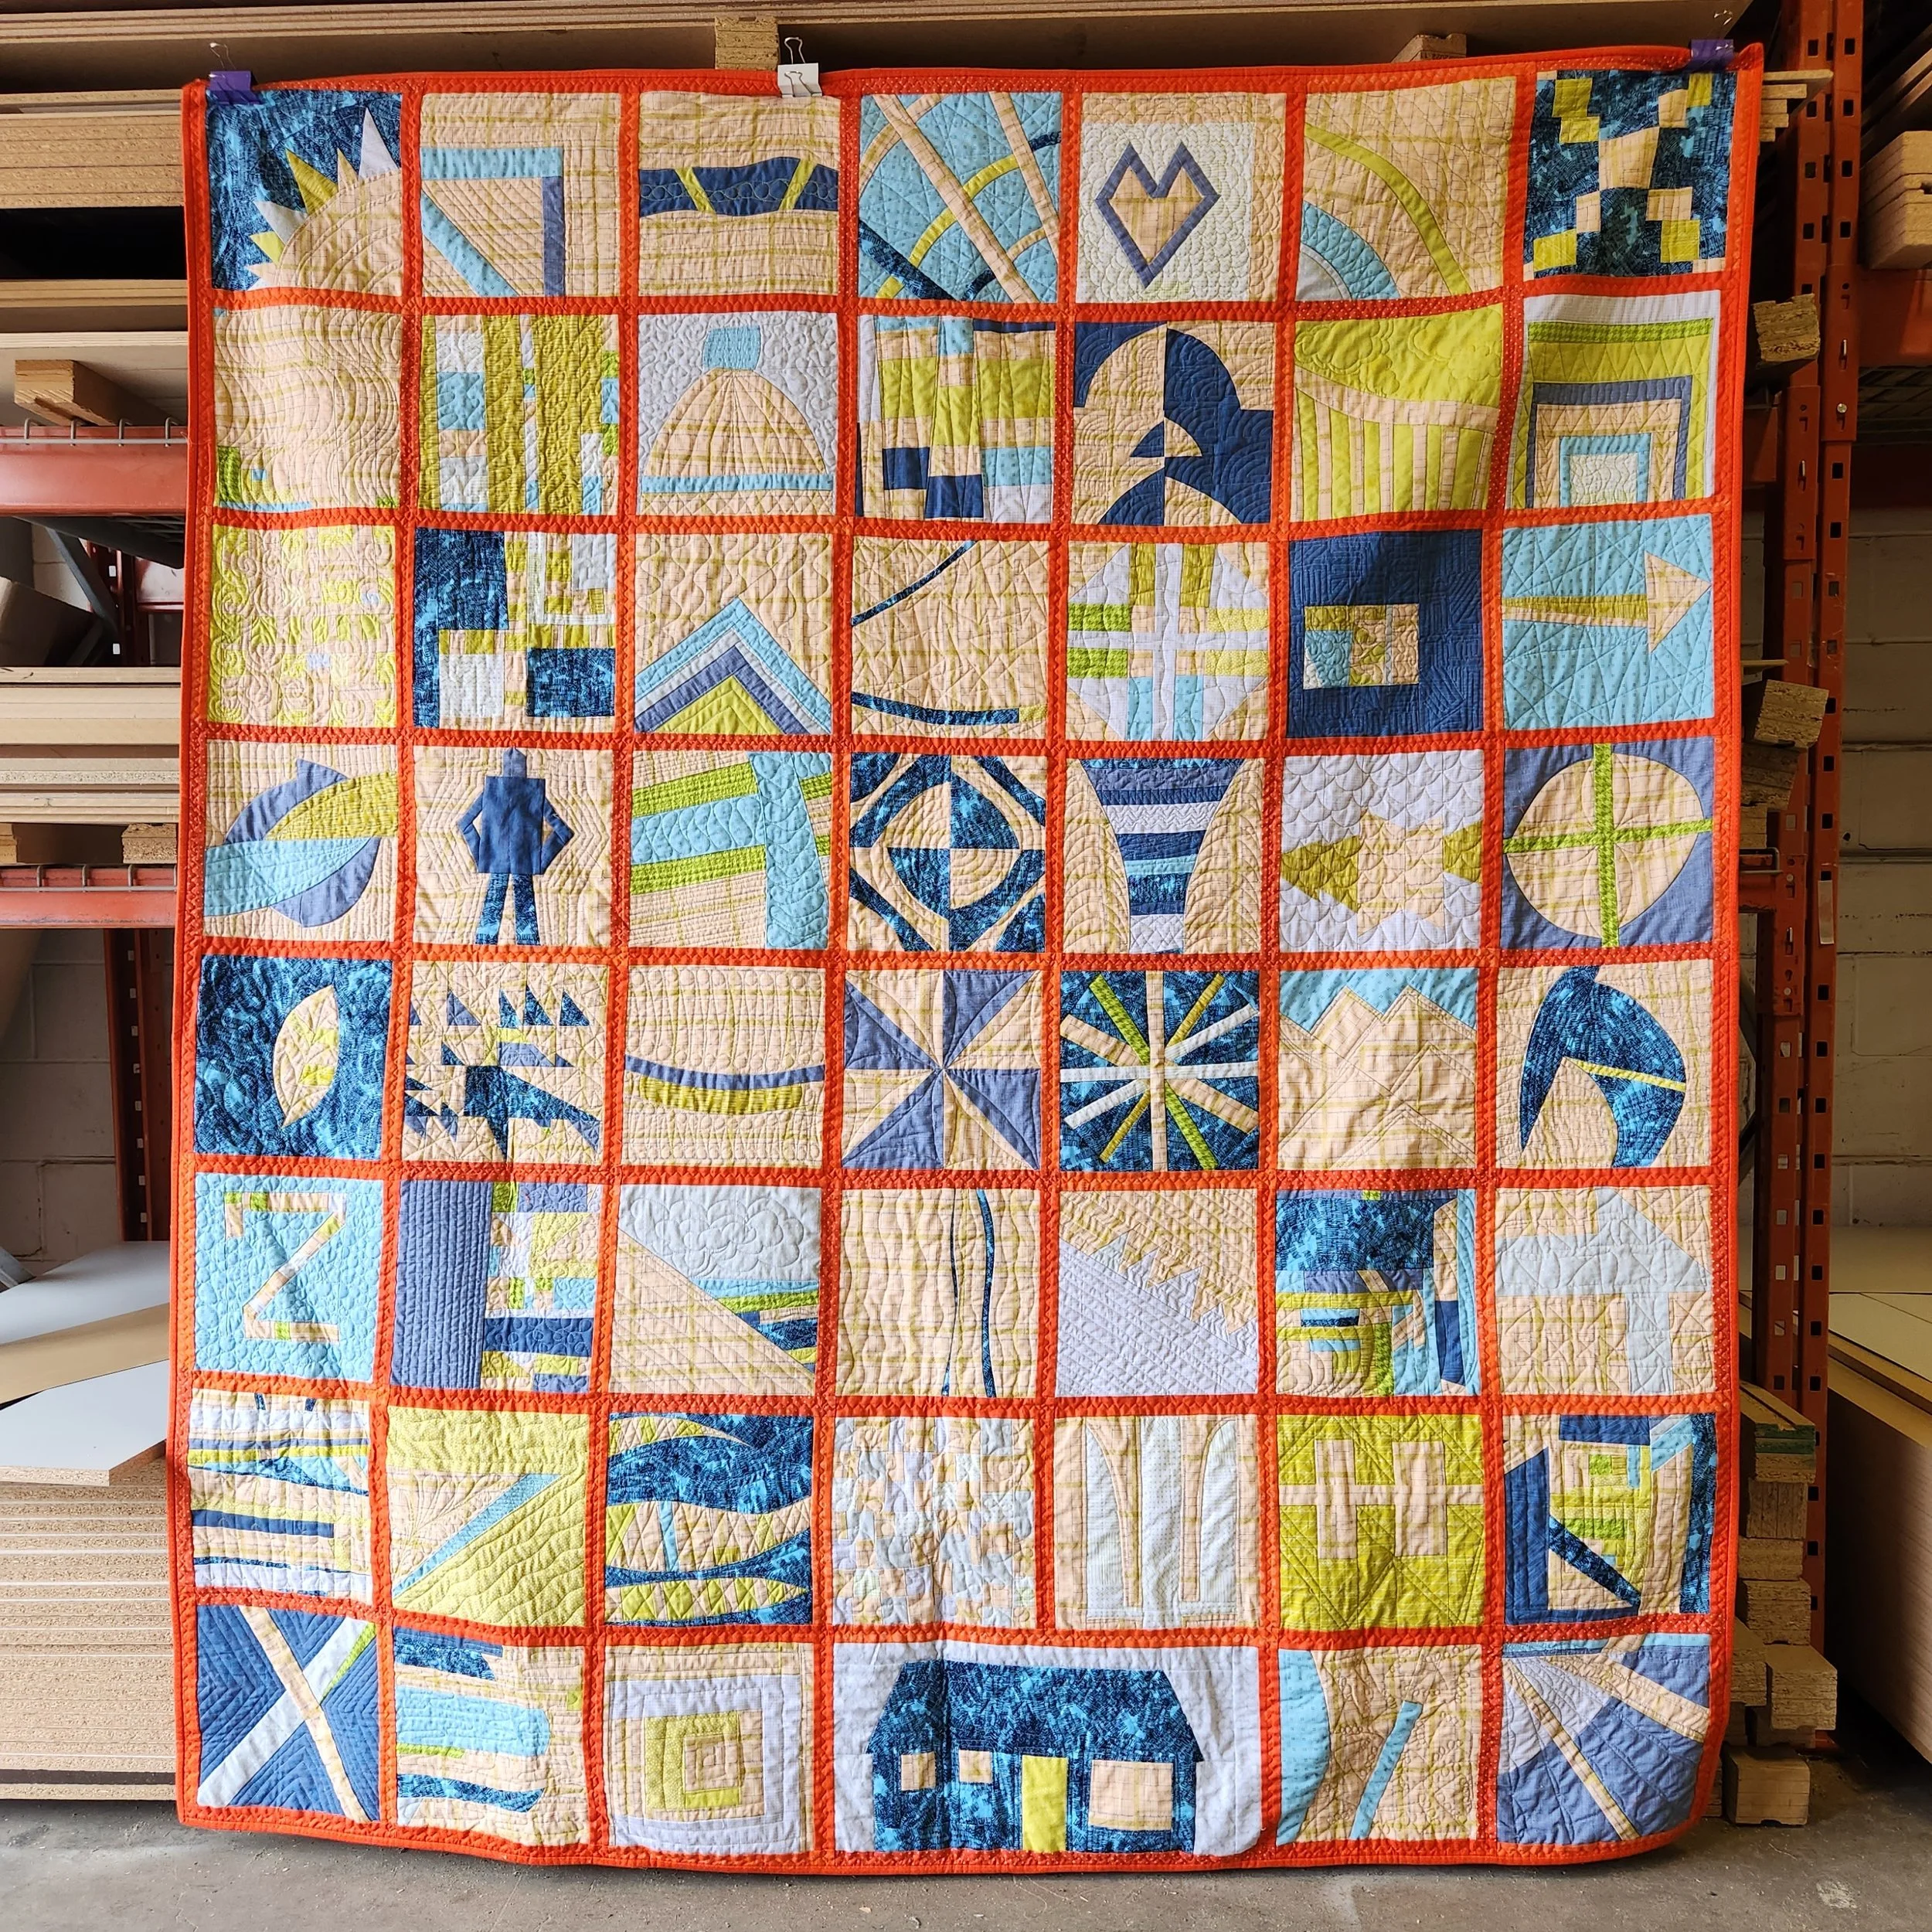
When you cut a bunch of random shapes to make 30 quilt blocks you are left with a lot of weird little scraps. Not surprisingly, I decided to sew them all together into a slab. No rhyme or reason to the construction, just what fit. A few concessions to design in order to manage the bossy red and dark blue fabrics, but that’s it. In the end, it pretty much used up all my scraps too.

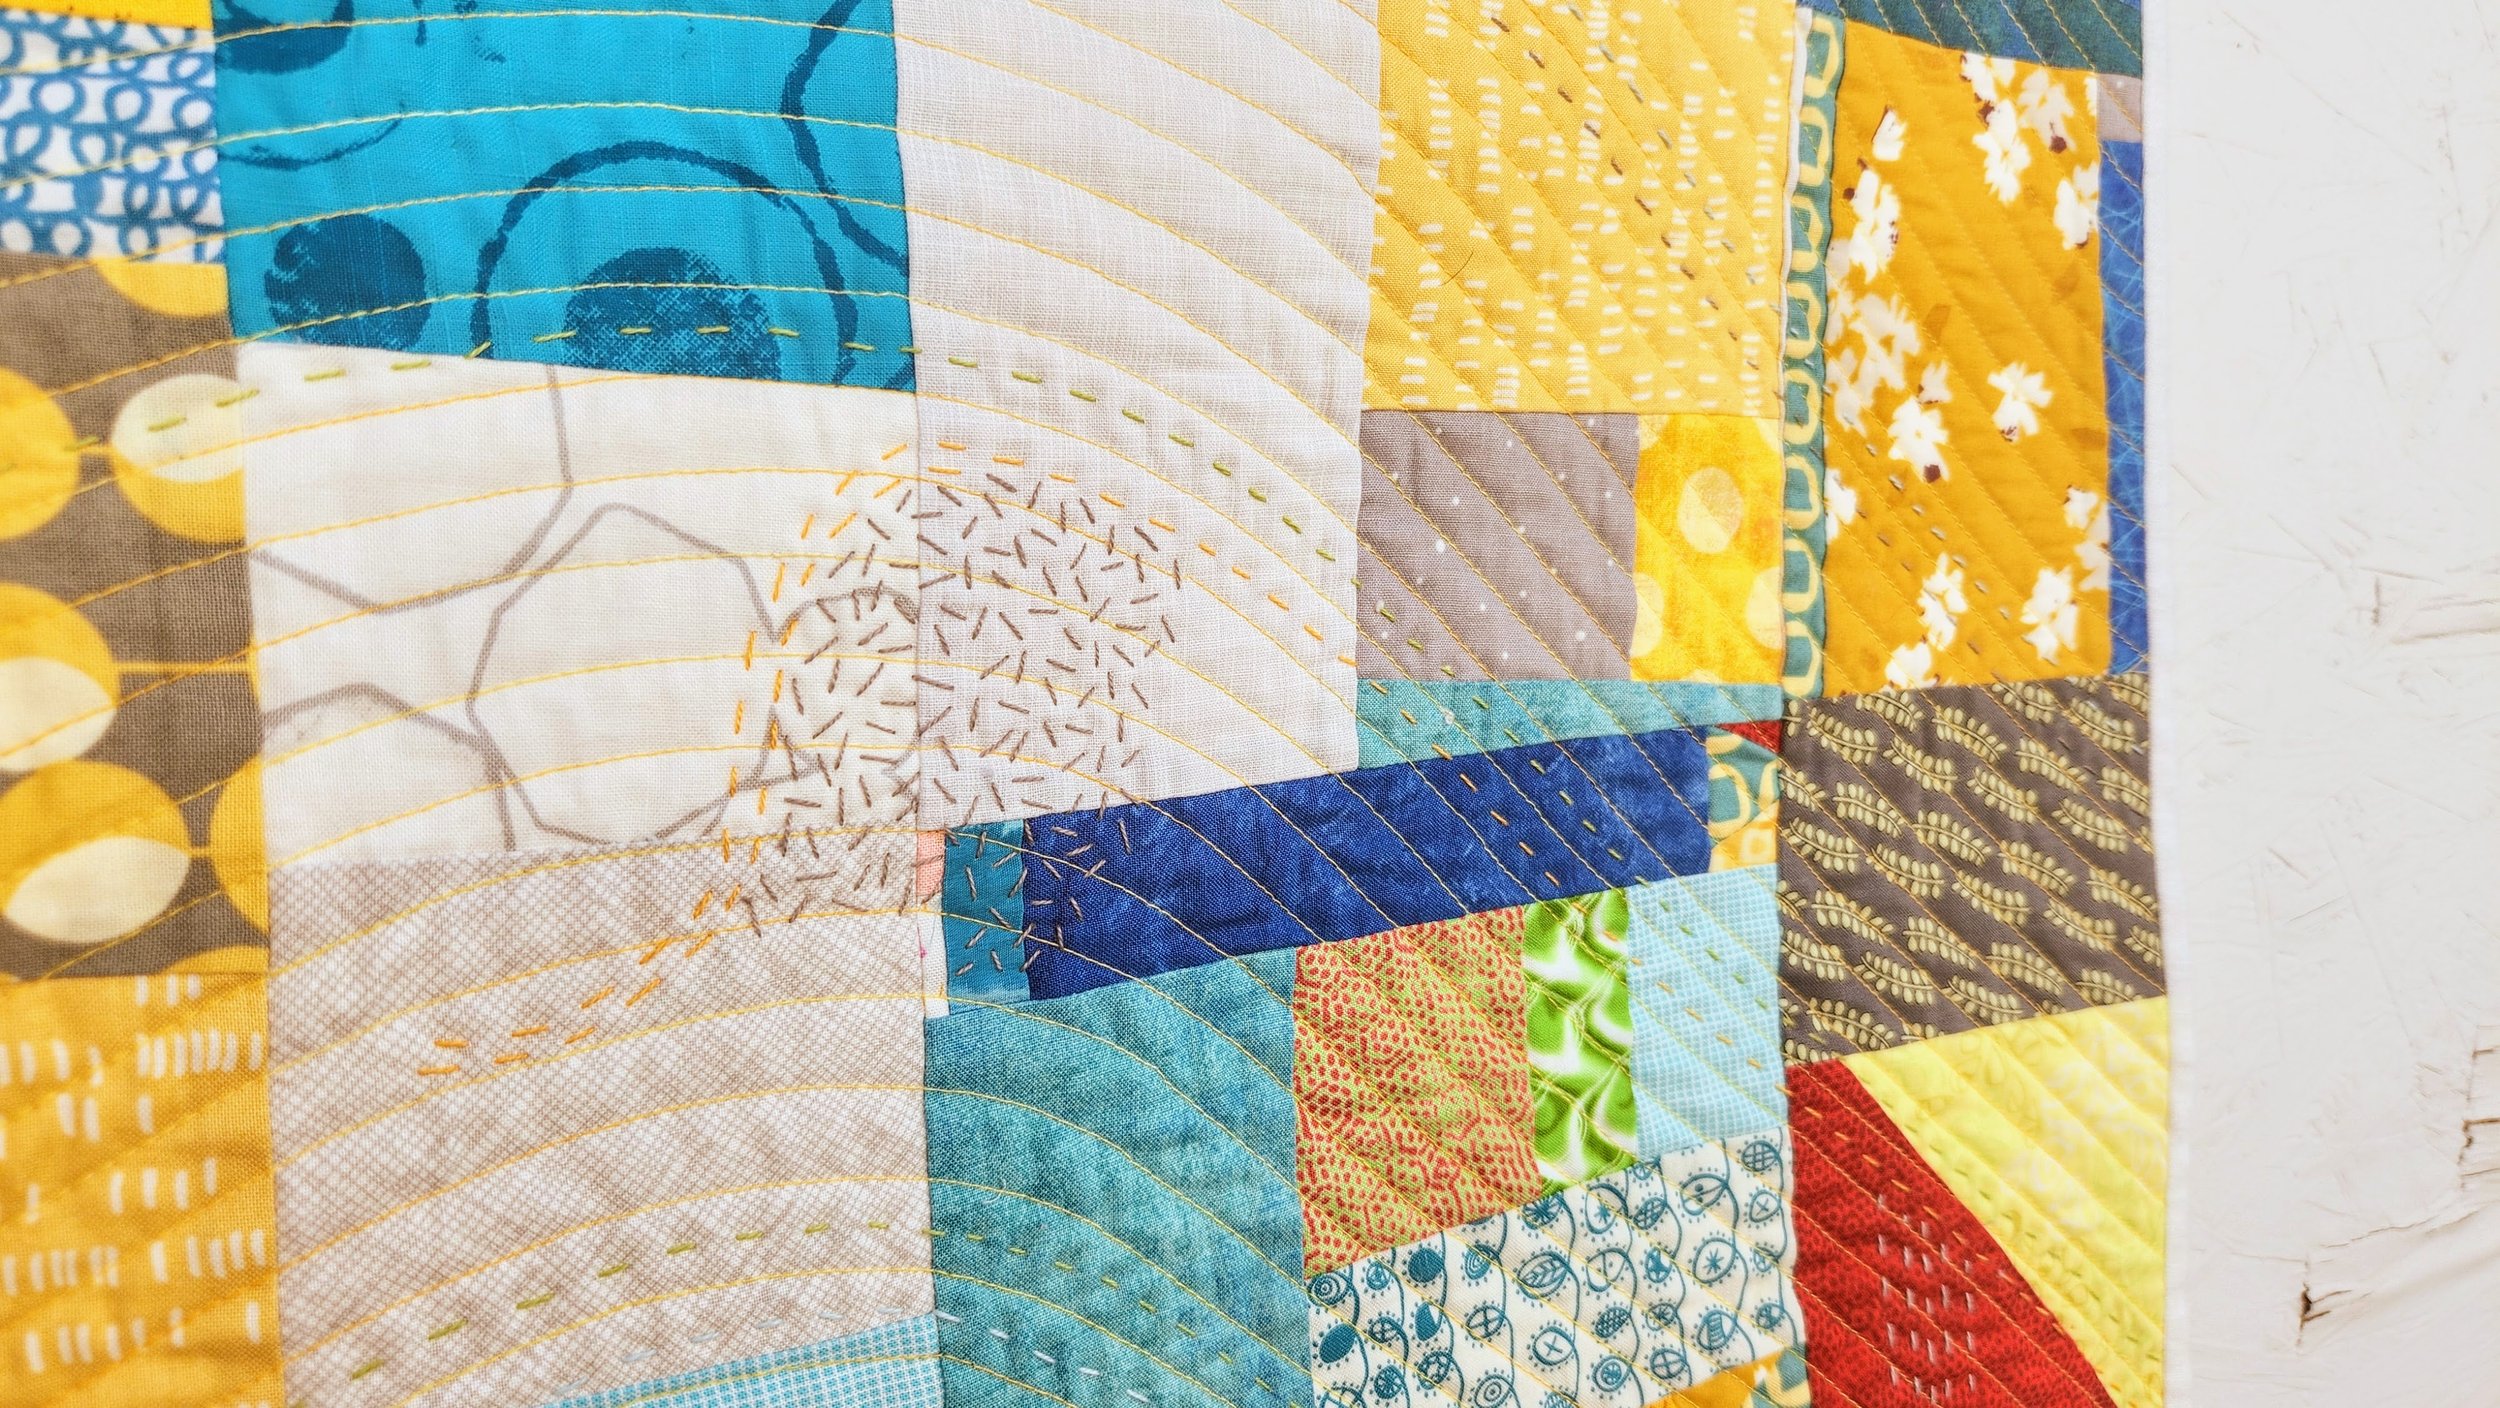
Since my big Bernina spent the summer at the spa I decided to test out her energy and fixes by quilting this immediately. I grabbed a random variegated yellow from the stash and went for an echo wave using my walking foot. Good news, many of the fixes the old girl needed happened. (Just like me and my summer off.)

Not one to stop at just simple and because I really enjoyed the handwork over the summer I decided to add some hand quilted elements. I’d actually brought the thick thread with me on the trip, but never used it. Just a few colours to add some shapes and texture here and there. it would have been easy to go overboard, so I had to exercise some restraint. The hand quilting threads are a mix of Valdani and Wonderful Eleganza.

To finish off this piece I went with a white linen binding. Not just any linen though! I had a pair of pants that I bought for the trip and they ripped before the trip was over. That dreaded thigh rub ruined these quick. While I wouldn’t use such an obviously weak linen on something that will get used and washed, it worked perfectly here for the binding. You can see more of that process here.

Now, in our house my husband mandated a no quilts on the wall rule years ago. But here I am making not 1, but 2 wall hangings! I can probably convince him to hang up the trip diary quilt when finished, but this one might be pushing it. It’s okay, I think I might give it away. One of my daughter’s teammates travelled with us on their off week so we spent 3 weeks with him and I think I might give this to him and his family as a souvenir.

Oh, and the name? I named her after our lovely guide in Cairo. Randa was an outgoing, very knowledgeable Egyptologist. We had a great time with her and are very grateful for her kindness over the days we spent together.

Queenie - Quilters' Playcation Adventure Sewalong 3 Solids Version

Queenie

Not going to lie, this might be one of the best quilts I’ve ever made. That is, from a quality perspective. It might be one of my favourites, from a fun factor perspective.

This is the 3 Solid Version of the 2022 Quilters’ Playcation Adventure Sewalong. Each week I made two blocks: a print version and these 3 solids version. To be fair, the quilt ended up being 5 solids because I grabbed the wrong white a few times and then had to improvise with a non matching grey when I ran out as I was piecing the top. C’est La Vie! That’s what improv is partially about - just moving forward when faced with a challenge instead of letting it bog you down.

From week one of the Adventure Sewalong I knew I would use the colours of the block to help guide the lay-out, wanting blocks to disappear and have shapes emerge. It works well on the abstract blocks, but the representational ones change it a bit. I played with many, many layout options over a few weeks. Quite a few of them worked well, but didn’t grab me. With all my blocks a different size the possibilities were truly endless. It all clicked when I put that block in top centre. It was the top of my mountain. This was the jolt I wanted.

(It also reminded me of what I said about my hiking challenge last year and the link to improv.)

Once she was all pieced I decided to take her to the long arm. Mostly, I was impatient to finish her and my machine was not acting very powerful anyway. I chose a yellow thread and doodled all over the quilt. As usual, I like a dense pattern. Through out the quilting I added a shape of a person cheering. Pure joy! The yellow thread (from Superior, but I can’t remember the colour) added a highlight that I loved on all the colours of the fabric. This was not a time for the quilting to blend into the background, it’s part of the story. And knowing that I’d always planned a contrasting binding I just had to choose between a few colours. My first two choices were pink and mint green, but at the end of the day, neither felt right.

So much of quilt making is trusting your gut.

The yellow colour was also chosen not because of my bad photography, but because of the backing fabric choice. One of the girls suggested a hot pink backing and I whole heartedly agreed with them. Unfortunately, I did not have enough of anything to piece together a backing from my stash so I went hunting for a wide back. While a good pink was elusive, I did find this great Anna Maria Horner print that included the exact blue I had on the front. Kismet! This is what ended up dictating the yellow thread choice and the yellow binding.

Now when I say this is the best quilt I’ve ever made, technically, here is why I say it. The piecing of the blocks together was far from straightforward. There were partial seams a plenty and I got them to all lay flat. With fillers and creativity I got everything to fit and still look good. I’m very proud of the quilting as my tension was perfect and the doodle came out better than when I was practising at home. Finally, by binding finished very nicely. Good, even stitches by hand. Bonus, the whole thing lays flat and square! Taking your time does wonders for quality. And for your joy in making.

Thank you to everyone who participated, watched, sewed along, and asked questions. Our weekly playtime was such a wonderful experience and I am so glad to have these quilts as reminders of our time together.

Polly - Quilters' Playcation Adventure Sewalong 2022 in Prints

Polly

78” x 89”

Polly lived most of her life following the rules. Getting married when she was supposed to. Having kids when she was supposed to. Baking all the things, keeping a clean house, volunteering at church. Her life was as it should be. It was also painfully boring and Polly had no idea who SHE was in the midst of everyone else’s expectations. Finally, with the kids gone and her husband on the golf course Polly had a chance to explore herself. That meant figuring out what she actually liked in bed to what food she wanted to eat for herself. She took herself out almost daily and explored the world around her one little trip at a time. It’s not that she hated her life, but she didn’t know if she actually liked it. Little by little she explored, experimented, and learned to enjoy what she, herself, could give and get out of the world. She finally knew who she was, who she wants to be.

This quilt is a culmination of the Quilters’ Playcation Adventure Sewalong 2022. Each week for the year I shared how to make a unique improv quilt block. One version shared was a three colour solid and this version was love affair with prints. When I started the year and I stressed leaving open the finished block size so layout possibilities were endless. By the end of the year I knew this version would have blocks all the same size. After measuring my blocks I picked a 10.5” square as my default size and got down to the business of cleaning everything up. 52 blocks, however, does not make for even sides on a quilt, so I used scraps to make a handful more blocks to get to 56 blocks. This gave me a 7 x 8 block layout. Sashing in this collection of red-orange prints framed out each block. I’m not generally a sashing girl, but I think it absolutely works here!

She’s a big quilt so I knew that quilting her would not be easy. I had a friend baste her on the long-arm to save me some time. Turns out that this layout and the use of sashing actually simplified the quilting a lot. I used the curvy stitch that comes on the Bernini in the sashing. That was easy. Then I just quilted each block on its own. Free motion quilting is very manageable when you only work one block at a time. Each block got quilted uniquely. Sometimes it was an all over design, sometimes that outlined or directly highlighted the piecing. The decision was most dictated by my mood when I got to that block. I switched out threads between peach, pale grey, light blue, and an olive green. I filled a bobbin and when that or the spool ran out I switched to another colour. All the threads blended very well on the wide back Kaffe Fassett I used on the back.

The original plan was for a dark binding, with a bit of green piping. I did not have in my stash nor could I find anything in the store that was a good blue that worked for this. Grey washed things out too much. Also, I had deadlines for a local show. So I used more of one of the sashing prints and extended that orange line. The green did make an appearance in my stitching though. I chose to use a Perle thread (from Valdani) to stitch down the binding in a visible manner. I love this way of finishing a quilt. It’s fast and has a great effect.

Polly is ready to explore the world now.

View all the free tutorials here.

Check out the layout discussion for all the quilt blocks.

Sew along with the 2023 Quilters’ Playcation Adventure Sewalong.

Morning Make 2023 - Raw Edge Appliqué Portrait

This portrait feels a little more me. I don’t mean the likeness, although I think that is there. Rather, as a quilt it feels more me. To complete the portrait I made up the process. Enough years of play and exploration gave the confidence to just go for it. Well, that and a willingness to try a few things in the hopes of success. Also, very me.

Since my drawing skills are lacking, albeit improving, I took a different tact to create my actual portrait. I printed out a photo of myself and traced it. I reduced the lines to those necessary to get a likeness and some interest, with a hope that it wasn’t too much of a cartoon. I just printed the photo off at the office, on the regular inkjet printer. After tracing my lines I scanned the new drawing to create a digital image. This I sent to my local print shop to have printed at a much larger scale. I think we used their 18” x 24” printer.

Once I had the drawing I reversed it and traced it on to some double sided fusible. In this case, Wonder Under. I’ve had good luck with it in the past so was confident using it here. More on that shortly. I debated a glittery purple for the appliqué but ended up with a tone on tone black from my own fabric collection.

With the lines traced I pressed the fusible and fabric together. I cut out the appliqué from the fabric. In hindsight I would have made less cuts, like where the jaw line and hair meet, but I was a bit unsure of how it would come together at the beginning.

For the background I decided I wanted something that felt more me. The previous portraits were great, but I wanted a bit more of my kind of quilting in there. Instead of making something new, I dug out all the crumb blocks I’ve made over the years and put together a handful to create the background. Knowing I was using black for the appliqué I tried to use pieces with as few black or dark pieces in it, so that there was always contrast with the appliqué. Without a purpose built selection of crumb blocks this is mostly, but not all the way successful. I’m still happy with it. And one dark scrap ends up mimicking the scar on my neck from last year’s thyroid surgery.

After playing with the positioning I removed the backing from the fusible and pressed the appliqué into place. And pressed it into place, and pressed it into place. It would stick for a while then come undone. Rather frustrating. I’ve never had trouble with Wonder Under before. I even bought new stuff in case what I had was too old. If I do this again I will be choosing a different fusible.

The drama with the fusing led to my quilting plan. I didn’t want to zig zag stitch around every piece. I just don’t like that look. But with the appliqué misbehaving I needed a dense quilting plan to keep everything in place. Matchstick quilting was the obvious choice, but I don’t like to be too predictable. I marked a few lines and decided to do rays from one corner. A lot of rays.

WIth a strong multicolour background I knew that thread colour wasn’t super important. With dense enough quilting it would also hold the appliqué down and provide varying contrast on the black fabric. Embracing my inner and outer scrap quilter I pulled out all the partially filled bobbins that I had. Finding their coordinating spools I went nuts with multicolour rays. And I cleaned out 6 bobbins to open them up for new thread choices without wasting any thread!

All of my self portrait quilts are bound with the same tone on tone black fabric using the single fold technique. It creates a sharp edge on these smaller quilts.

Since finishing these quilts I’ve been practicing my drawing and painting some more. I recently started an embroidered portrait too. Perfect for on the go. I’ve got my next quilted portrait planned out too. I want to continue to explore how I can make these more me.