"green is not just a colour"

December Morning Make 2022

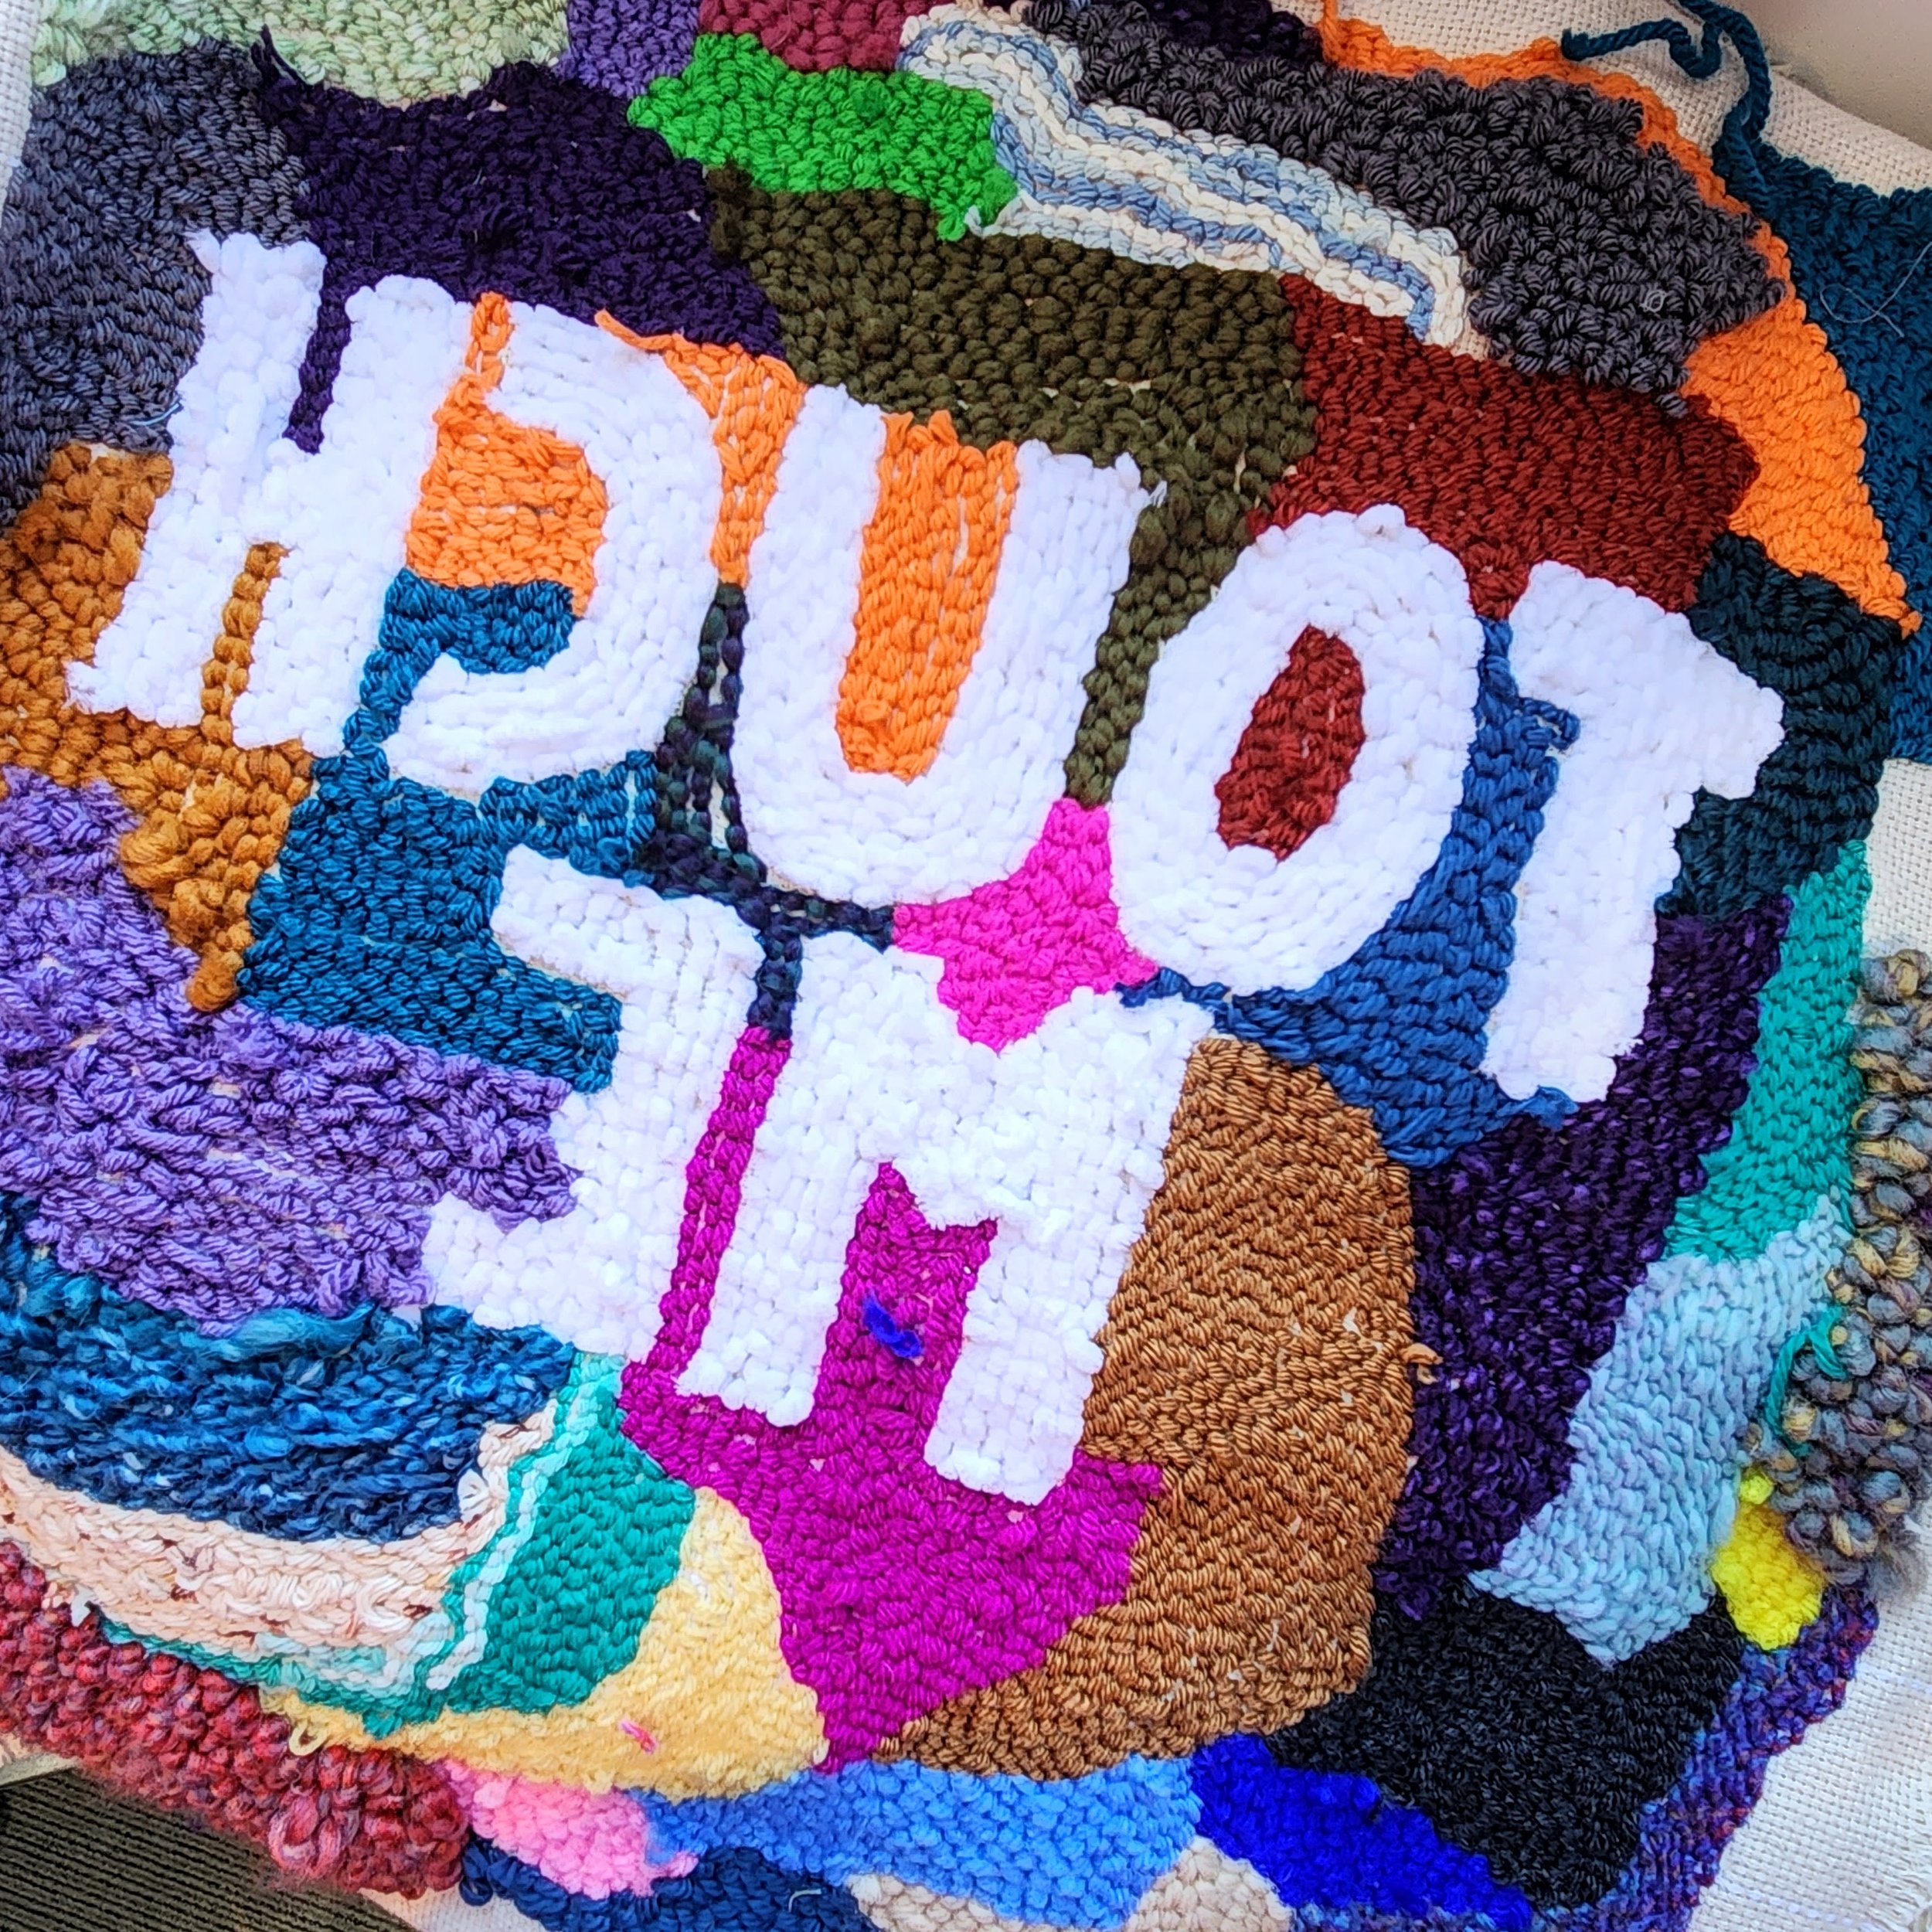
A bit too on the nose?

In December I dug into my daughters’ craft supplies, augmented by yarn scraps from a dear friend who knits, and experimented with punch needle. Each day I used one little ball of yarn to randomly fill a space. It’s easy to do and doesn’t take long at all. Indeed, some morning’s I was at it for only 5-10 minutes. In the crazy days of the winter holiday season it was just about perfect.

We had a ball of that ultra soft acrylic yarn in white. A fake chenille? It was the right choice for the directions.

I’ve been thinking about touch a lot this winter. Realizing, mostly, how important it is to me. Not that I am a huge smuggler or hugger, but I do love a good hand hold. I was reading about how you can get your own body to release dopamine and serotonin and reduce cortisol (the stress hormone) through non-sexual touch. I found myself gently petting or rubbing my own hands in a calming gesture. My husband thought I was weird, if I’m being honest, but I found it very helpful.

Thinking about touch and seeing the benefit of these simple hand movements for myself also made me realize that this is part of why I like hand work. Using your hands isn’t just useful for the task at hand. It activates something else, something associated with the sense of touch outside of the brain’s task. When I am getting stressed or ansty I tend to feel an energy in my hands that is distracting and uncomfortable. I am often looking for an outlet to ‘get it out’. The more hand work I do, the more active my hands are in a positive way, the less I feel that bad energy.

Punch needle itself is practically fool proof with the right tools. Obviously some yarns and tools are easier to work with. It really does help, as well, to use the right base cloth. If I were to do this again I would upgrade our punch, the cheap plastic one we had was nice for being adjustable, but not very comfortable in the hand.

One of the things I quite liked is that the back is/can be as neat as the front. Depending on whether you used the punch from the front or the back it changes what you see, but both work. Varying the thickness and type of yarn as well as the depth of the punch meant I have a lot of textural and visual variation in the piece. Being open to the scrappy nature of this comes naturally for me as a quilter. If I hadn’t used words I could have chosen which side to display.

In the end, I mounted the piece on an old dollar store canvas with a staple gun. We don’t need another pillow in this house and I liked the visual of a mounted piece.

Small Piecing Pays Off

When your only goal is to clean up some little bits of fabric leftover from another project you don’t expect to launch in to sewing an epic quilt. In truth, most of my quilts start with zero intention of being a finished quilt. Rather, it is just something to sew at that time; some experiment to try; some play to improve my mood. So when I had those leftover red squares from this quilt I just sewed them together with some low volume scraps so that they wouldn’t go to waste or get lost. I had no plans, no design, no lofty goals.

But…

They did look quite good together. And what if you sewed two pairs to each other? Oh look at that cute 4 patch! Hmm, there might be something to this…

Reader, there was. I started adding turquoise, then green 4 patches. Those colours look great together and it was all so cheerful. Of course I have a tonne of low volume scraps so I could use them up too. So now I made a 4 patch of two 4 patches. Oh boy, this was getting good!

A 4 patch quilt block made from a few 4 patches in turquoise and white, held in a white hand

One thing led to another, one block led to another, and even though I sewed a whole pile of blocks I still had no clue where this was heading. Sure, it would be a quilt one day, but just how far was I going to go?

Quite often I just sew until I get bored. Then the quilt is as big as that many blocks, give or take a few. I use what I made to puzzle together something (hopefully) cool. In this case I reached a point where some actual planning was required. Since I don’t like to make small quilts I did some math and even sketched out the layout to see where I needed to finish. This was my guide for sewing.

Most of the blocks were made as leaders and enders while making other quilts. I kept a bowl of the coloured scraps and a bowl of the low volume scraps by my machine and sewed a pair together at the end of any other seam. These would pile up until I felt motivated to press them. Then I would make the 4 patches as the next round of leaders and enders. At some point these would get both pressed and squared up. That required more motivation because I was squaring them up to 2” by 2”. Tedious work. Then those would get sewn to a low volume square in the next round. Pressing again then the last seam to join two of those pairs together. Usually by the last step I was doing some dedicated sewing on these blocks instead of leaders and enders. It was all very reminiscent of this.

Pair of blue and orange glasses resting on a folded quilt top.

Eventually I became dedicated to finishing all the blocks. If I had started this quilt with the end goal in mind I can honestly say I wouldn’t have started. This was a very tedious make. Don’t get me wrong, I believe all the effort was worthwhile and any time sewing is time well spent. But when you make a quilt from small pieces it can be nearly impossible to see the end from the beginning. Like climbing a mountain when you have no idea just how high it is. Or deciding to swim across the lake without knowing how far it really is. It’s all possible, but it is going to take some time to see the final achievements. So even though I had a specific plan and number of blocks needed, it was hard, in the years I’ve had this quilt ongoing, to see the finish. Glad to be here now. Real glad.

Now that the quilt top is done I will probably get it quilted fairly soon. It isn’t impatience that motivates me, it is a desire to not have to press this quilt top again. That was a lot of seam management there!

Oh, and for those wondering, the quilt top finishes at 63” x 81”.


Linda - September Morning Make 2022

Linda

79” x 72”

Linda is a force to be reckoned with. A retired educator she may be seen as not much to society now but she still brings joy to people and holds the world together for her family. The matters. She matters. She knows pain and joy, she struggled and fought but is coming out better for it. And now, as a grandmother she gets to see her children blossom more and those babies bring light to all.

This quilt came together in the month of September. Each day started with a scrap of batting and a handful of scrap strips. Trying to avoid a log cabin I sewed the strips to the batting one at a time. When the batting was covered I added a backing piece and quilted lines over it all. Sometimes straight, sometimes curved, sometimes on the diagonal. Then I trimmed it square. Repeat the next day. Essentially, I was making mini quilts, without the binding.

The technique is known as quilt as you go. There are actually a few different ways to approach the technique and, more importantly, how to approach attaching each piece to the others. Before I started I did some research and landed on the way that Marianne Haak teaches. I liked hers because I could quilt to the edge, rather than have to stop, and the joining method would use more strips. For my particular intentions this was perfect. I joined pieces every few days so it would keep me on track for a totally finished quilt at the end of the month.

Back of a quilt as you go quilt showing the various grey fabric squares joint together by strips.

You can see the back of the quilt here. Initially, I used the large scale print fabric. It is one from my 2017 collection with Connecting Threads called Tag. Unfortunately, I ran out of what I had left partway through the quilt so I had to back half the blocks with something else. With a busy fabric you wouldn't likely see the joining strips. In the end, I rather like the effect of the two fabrics on the back.

Close up of the straight-line quilting and pale yellow binding on a scrappy quilt

One of the great things about this technique is no basting! You quilt each block as you finish piecing and none were big enough to even need a more than a few pins. Then, at the end of it you have a finished quilt and it didn’t take much longer than the regular piecing. Brilliant! So all I had to do was pick the right binding and stitch it on. In the end, I chose this great pale yellow print from Heather Givens from Crimson Tate.

I used all scrap strips to make this quilt. I deliberately chose not to use blacks, dark greys, dark blues, or any muddy colours. As a result, the quilt is bright and sunny. It certainly made a dent in the strip bin, but I could easily make more quilts this same way. Indeed, I have a few more ideas for playing with this quilt as you go technique. It’s a win win situation too because I have a whole pile of scrap batting!

pastel scrappy quilt hanging off a forklift in a mostly empty workshop

All the photos taken in the space that will become both our family business’ new workshop and my new quilting studio.

February Morning Make 2022

Stack of 25 multicoloured, improvised quick blocks made from scrap fabric

No, you have not gone back in time. It’s February and I made crumb blocks for Morning Make. Again. That’s because the scraps never disappear and there was a whole year of quilting between now and then. Besides, you can never go wrong with crumb blocks.

A collection of scrappy, improvised quilt crumb blocks grouped together on a design wall.

The technique is the same, the collection of fabric is 95% my own scraps, but there is one difference between this year’s blocks and last year’s: the size of the crumb. When I went to sort the scraps into size - always the first step in these crumb blocks - I realized that my scraps were just that little bit bigger. What counted as a small in this collection was a large in last year’s. I debated cutting things down for a brief moment, so that the blocks were similar. Then I, wisely, decided that that would be ridiculous. Extra work and it would then barely make a dent in the scraps.

Design wise, I was sure I could make a combination of the blocks work. You can see above a hint of what might happen when they come together, as the first few blocks made with smaller crumbs are in the center. With small bits in all the blocks regardless you can make transitions come together.

Hand woven rope basket in front of scrap quilt blocks on a design wall

Of course there is still fabric left. Of course.

One of these days I will get last year’s blocks up on the design wall with this year’s. Then I will use the scraps I have left to fill in any gaps. After that? Well, I make no promises on the scraps’ fate.